Thursday, February 17, 2022

Nature's Harvest

 Hello, Stampers! 

Today's card features Stampin' Up!'s Nature's Harvest. I love the summer feel, especially with spring right around the corner! The DSP is so pretty, I love the Soft Succulent with the script background. I have used this so much I had to buy another pack of paper! 

This card layout is a great way to showcase your DSP as well. Use any stamp set with a good focal image too. This is such a versatile card layout. Have fun and share your card images with me. I can't wait to see what you come up with!!

Don't forget to enter the hostess code when you purchase your supplies! The supply list is down below. 

Hostess Code: D7QWAEKU

Here is the main card I made:   


 What I Used: 

  • Whisper White Cardstock 8 1/2 x 11 cut at 4 1/4 and scored at 5 1/2, a scrap of WW.
  • Evening Evergreen 2 x 5 1/4 
  • Harvest Meadow DSP two strips cut at 1 x 5 1/4
  • Die set from Nature's Harvest
  • Timeworn Type 3-D embossing folder
What I Did:
  1. Gather supplies needed from above.
  2. Cut layers as measured above
  3. Glue the two strips of Harvest Meadow DSP to the edge of the base card. Be sure to leave a 1/8 inch or so border.
  4. Run the Evening Evergreen paper through the Timeworn Type 3-D embossing folder. 
  5. Glue the strip of Evening Evergreen between the two DSP pieces. 
  6. Using Memento ink, stamp the floral stamp onto cardstock.
  7. Color the image with the blends according to the picture above.
  8. Run the image through the die cut machine using the matching die from the Nature's Harvest bundle.
  9. With a scrap of Evening Evergreen, die-cut the silhouette image of the wheat/grass die. 
  10. Glue down the silhouette image on the base card
  11. Glue the floral image down over the silhouette image.
  12. Stamp the sentiment and cut it out with the die from the set.
  13. Pop up the image with dimensionals and place it on the card.
  14. Using the Evening Evergreen blend, color three rhinestones, and place them on the card. 

Click the image below to watch my video on Youtube! 


 Here is the product list: 

Nature's Harvest Bundle (English)
$53.00
Harvest Meadow 12" X 12" (30.5 X 30.5 Cm) Designer Series Paper
$11.50
Whisper White 8-1/2" X 11" Cardstock
$9.75
Timeworn Type 3 D Embossing Folder
$10.00
Multipurpose Liquid Glue
$4.00
Evening Evergreen 8 1/2" X 11" Cardstock
$8.75
Stampin' Blends Color Lifter
$4.50
Evening Evergreen Stampin' Blends Combo Pack
$9.00
Cajun Craze Dark Stampin' Blends
$4.50
Pumpkin Pie Stampin' Blends Combo Pack
$9.00
Poppy Parade Stampin' Blends Combo Pack
$9.00
Mango Melody Combo Pack Stampin' Blends
147945
$9.00
Rhinestone Basic Jewels
$5.00
Tuxedo Black Memento Ink Pad
$6.00

Thursday, February 10, 2022

Ranunculus Romance

  Hello, Stampers! 

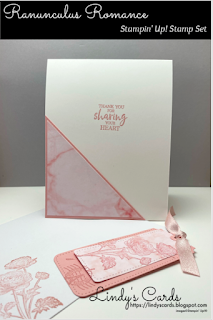
Today's card features Stampin' Up!'s Ranunculus Romance. It is a beautiful
stamp set. The images are so lovely. They are so 'shabby chic" to me. I do have a soft spot for floral images too. I made several cards and will share the pictures below. Be sure to check out my video for the card I spotlighted from the set. 

Don't forget to enter the hostess code when you purchase your supplies! The list is below. 

D7QWAEKU

Here is the main card I made:   


                             What I Used: (Lots of pieces but it goes together quickly)

  • Whisper White Cardstock 8 1/2 x 11 cut at 4 1/4 and scored at 5 1/2, a scrap of WW.
  • Blushing Bride Cardstock cut at 4 x 5 1/4, 2 7/8 x 4 1/4, 3 1/2 x 3 1/2, 2 x 4
  • Simply Marbleous DSP cut at 3 7/8 x 5 1/8, 3 1/4 x 3 1/4, 1 1/2 x 3 1/2
  • Heart & Home DSP cut at 2 5/8 x 4 1/8
  • Vellum 2 1/2 x 4

What I Did:
The Outside: 
  • Gather supplies needed from above.
  • Cut layers as measured above
  • Glue Blushing Bride mat to the card base
  • Glue Simply Marbleous DSP layer onto the Blushing Bride mat-set aside
  • On vellum, (all images stamped on reverse side) stamp border-image in Blushing Bride
  • Ink up journal-looking stamp with Blushing Bride, stamp-off once,  then stamp image. Continue to do this step (3-5 times).
  • Ink up the Eiffel Tower stamp and stamp this full-strength 3 times. 
  • Set Vellum aside and let dry. 
  • Using the Blushing Bride marker, color the flower portion of the flower stamp. 
  • Using the Pear Pizazz marker, color the stem portion of the flower stamp, then stamp the image onto a scrap piece of Whisper White cardstock. 
  • Cut image out
  • Carefully tear the edge of vellum for a "shabby chic" look
  • Using a tape runner, adhere ribbon to the vellum, secure on the back of the vellum
  • Adhere flower image to vellum using dimensionals.
  • Adhere the vellum to the Heart & Home DSP. 
  • Glue this onto the second mat of Blushing Bride
  • On a scrap, Marbleous DSP, stamp the sentiment and back it with a Blushing Bride piece. 
  • Pop up the layer with Dimensionals and adhere to the main card image.
The inside: 
  • Cut the 3 1/2 x 3 1/2 piece from corner to corner so you have two triangles. You only need one triangle.
  • Cut the 3 1/4 x 3 1/4 piece the same. 
  • Adhere the two together and glue onto the bottom of the inside of the card, bottom left corner. 
  • Using the die-cut machine, cut out the largest tag with Blushing Bride
  • Using the die-cut machine, cut out the next tag with Simply Marbleous DSP
  • Adhere the two together.
  • Stamp the floral image using Blushing Bride ink. 
  • Put the ribbon through the top and tie it off. 
  • Added rhinestones for additional dimension/interest to the front of the card.
  • Don't forget to stamp the inside of the card as well as the envelope!
                                Whew!!! We are done!!

Click the image below to watch my video on Youtube! 


Here are more cards I made with the same stamp set!


Here are the supplies I used: 


Thursday, February 3, 2022

Artfully Layered

 Hello, Stampers! 

Today's card features Stampin' Up!'s Artfully Layered. It is a gorgeous
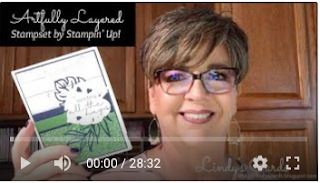
stamp set. If you love plants as much as I do I highly recommend it! One great thing is the versatility of the stamp set. All you need is this stamp set, some ink, and paper and you can make so many cards! 

Don't forget to enter the hostess code when you purchase your supplies! The list is below. 

D7QWAEKU

I have a few other examples for you today but this is the main card I made.                                                                               


What I Used: 

  • The base of the card is Whisper White. It is cut at 8 1/2 x 4 1/4 and scored at 5 1/2. 
  • The mat is  Night of Navy and cut at 5 1/4 x 4.
  • The DSP layer is from the  Heart and Home DSP cut at 3 7/8 x 3 1/2 (about) and split. Meaning one side is the top portion, and the other is the bottom.  
  • One strip of Night of Navy cut at 1" x 3 7/8
  • One strip of Garden Green cut at 1/2" x 3
  • scrap (3x3 or so) of Whisper White cardstock
  • Night of Navy scrap 
  • Night of Navy Ink
  • Rhinestones
  • Tombo Glue
  • Dimensionals
  • Artfully Layered Bundle
What I Did:
  • Gathered supplies needed from above.
  • Cut layers as measured above
  • Glued Night of Navy mat to the card base
  • Cut the DSP as measured above and flipped one piece (paper is two-sided) and glued them to the Night of Navy mat
  • Glued Night of Navy strip over the seam from gluing down the DSP
  • Popped up the Garden Green layer with Dimensionals 
  • On a scrap of Whisper White cardstock, I stamped the sentiment
  • Using a die-cut machine, I lined up the die for the solid leaf image and die cut it out
  • Using the die-cut machine, cut out the outlined dies as seen above in the card
  • Using the die-cut machine, cut out the cluster of leaves (heart-shaped) 
  • Assembled the rest card by using Tombo glue and popping up the images with dimensionals. 
  • Added three small leaves in Night of Navy to card for interest
  • Added rhinestones for additional dimension/interest.
  • Don't forget to stamp the inside of the card as well as the envelope!
Click the image below to watch my video on Youtube to follow along and create this simple, easy, and fun card!


Here are two more cards I made with the same stamp set!


Celebrating Sunflowers

   Hello, Stampers!  Today's card features Stampin' Up!'s Celebrate Sunflowers. With all that is going on in Ukraine, I thought ...