
Hello, Stampers!
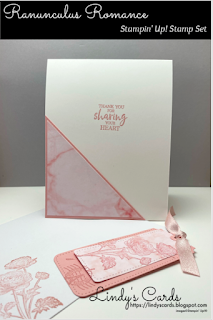
Today's card features Stampin' Up!'s Ranunculus Romance. It is a beautiful
stamp set. The images are so lovely. They are so 'shabby chic" to me. I do have a soft spot for floral images too. I made several cards and will share the pictures below. Be sure to check out my video for the card I spotlighted from the set.
Don't forget to enter the hostess code when you purchase your supplies! The list is below.
D7QWAEKU
Here is the main card I made:

What I Used: (Lots of pieces but it goes together quickly)
- Whisper White Cardstock 8 1/2 x 11 cut at 4 1/4 and scored at 5 1/2, a scrap of WW.
- Blushing Bride Cardstock cut at 4 x 5 1/4, 2 7/8 x 4 1/4, 3 1/2 x 3 1/2, 2 x 4
- Simply Marbleous DSP cut at 3 7/8 x 5 1/8, 3 1/4 x 3 1/4, 1 1/2 x 3 1/2
- Heart & Home DSP cut at 2 5/8 x 4 1/8
- Vellum 2 1/2 x 4
What I Did:
The Outside:
- Gather supplies needed from above.
- Cut layers as measured above
- Glue Blushing Bride mat to the card base
- Glue Simply Marbleous DSP layer onto the Blushing Bride mat-set aside
- On vellum, (all images stamped on reverse side) stamp border-image in Blushing Bride
- Ink up journal-looking stamp with Blushing Bride, stamp-off once, then stamp image. Continue to do this step (3-5 times).
- Ink up the Eiffel Tower stamp and stamp this full-strength 3 times.
- Set Vellum aside and let dry.
- Using the Blushing Bride marker, color the flower portion of the flower stamp.
- Using the Pear Pizazz marker, color the stem portion of the flower stamp, then stamp the image onto a scrap piece of Whisper White cardstock.
- Cut image out
- Carefully tear the edge of vellum for a "shabby chic" look
- Using a tape runner, adhere ribbon to the vellum, secure on the back of the vellum
- Adhere flower image to vellum using dimensionals.
- Adhere the vellum to the Heart & Home DSP.
- Glue this onto the second mat of Blushing Bride
- On a scrap, Marbleous DSP, stamp the sentiment and back it with a Blushing Bride piece.
- Pop up the layer with Dimensionals and adhere to the main card image.
The inside:
- Cut the 3 1/2 x 3 1/2 piece from corner to corner so you have two triangles. You only need one triangle.
- Cut the 3 1/4 x 3 1/4 piece the same.
- Adhere the two together and glue onto the bottom of the inside of the card, bottom left corner.
- Using the die-cut machine, cut out the largest tag with Blushing Bride
- Using the die-cut machine, cut out the next tag with Simply Marbleous DSP
- Adhere the two together.
- Stamp the floral image using Blushing Bride ink.
- Put the ribbon through the top and tie it off.
- Added rhinestones for additional dimension/interest to the front of the card.
- Don't forget to stamp the inside of the card as well as the envelope!
Whew!!! We are done!!
Click the image below to watch my video on Youtube!

Here are more cards I made with the same stamp set!


Here are the supplies I used:
Product List
 Blushing Bride Stampin' Write Marker [131265] $3.50 |  Pear Pizzazz Stampin' Write Marker [131266] $3.50 | |
 |
")


 Designer Series Paper")
 Designer Series Paper")


 Organdy Striped Ribbon")


No comments:
Post a Comment